Click on the link below to download the Algorithm Visualizer.
Showing posts with label Information. Show all posts
Showing posts with label Information. Show all posts
Thursday, 21 January 2021

Thursday, 14 January 2021
Contribution on GitHub
1. Fork repository of that User
2. Help him/her in code
3. Commit changes in code
4. Push your changes
5 Create Pull Request with a message
Sunday, 13 December 2020
Linux boot process
The Linux boot process is the procedure for initializing the system. It consists of everything that happens from when the computer power is first switched on until the user interface is fully operational.
Having a good understanding of the steps in the boot process may help you with troubleshooting problems, as well as with tailoring the computer's performance to your needs.
On the other hand, the boot process can be rather technical, and you can start using Linux without knowing all the details.
NOTE: You may want to come back and study this section later, if you want to first get a good feel for how to use a Linux system.
The boot process
The Boot Process

BIOS - The First Step
Starting an x86-based Linux system involves a number of steps. When the computer is powered on, the Basic Input/Output System (BIOS) initializes the hardware, including the screen and keyboard, and tests the main memory. This process is also called POST (Power On Self Test).
The BIOS software is stored on a ROM chip on the motherboard. After this, the remainder of the boot process is controlled by the operating system (OS).
BIOS

MBR and Bootloader
Once the POST is completed, the system control passes from the BIOS to the boot loader. The boot loader is usually stored on one of the hard disks in the system, either in the boot sector (for traditional BIOS/MBR systems) or the EFI partition (for more recent (Unified) Extensible Firmware Interface or EFI/UEFI systems). Up to this stage, the machine does not access any mass storage media. Thereafter, information on date, time, and the most important peripherals are loaded from the CMOS values (after a technology used for the battery-powered memory store which allows the system to keep track of the date and time even when it is powered off).
A number of boot loaders exist for Linux; the most common ones are GRUB (for GRand Unified Boot loader), ISOLINUX (for booting from removable media), and DAS U-Boot (for booting on embedded devices/appliances). Most Linux boot loaders can present a user interface for choosing alternative options for booting Linux, and even other operating systems that might be installed. When booting Linux, the boot loader is responsible for loading the kernel image and the initial RAM disk or filesystem (which contains some critical files and device drivers needed to start the system) into memory.

Bootloader In Action
The boot loader has two distinct stages:
For systems using the BIOS/MBR method, the boot loader resides at the first sector of the hard disk, also known as the Master Boot Record (MBR). The size of the MBR is just 512 bytes. In this stage, the boot loader examines the partition table and finds a bootable partition. Once it finds a bootable partition, it then searches for the second stage boot loader, for example GRUB, and loads it into RAM (Random Access Memory). For systems using the EFI/UEFI method, UEFI firmware reads its Boot Manager data to determine which UEFI application is to be launched and from where (i.e. from which disk and partition the EFI partition can be found). The firmware then launches the UEFI application, for example GRUB, as defined in the boot entry in the firmware's boot manager. This procedure is more complicated, but more versatile than the older MBR methods.
The second stage boot loader resides under /boot. A splash screen is displayed, which allows us to choose which operating system (OS) to boot. After choosing the OS, the boot loader loads the kernel of the selected operating system into RAM and passes control to it. Kernels are almost always compressed, so its first job is to uncompress itself. After this, it will check and analyze the system hardware and initialize any hardware device drivers built into the kernel.

Initial Ram Disk
The initramfs filesystem image contains programs and binary files that perform all actions needed to mount the proper root filesystem, like providing kernel functionality for the needed filesystem and device drivers for mass storage controllers with a facility called udev (for user device), which is responsible for figuring out which devices are present, locating the device drivers they need to operate properly, and loading them. After the root filesystem has been found, it is checked for errors and mounted.
The mount program instructs the operating system that a filesystem is ready for use, and associates it with a particular point in the overall hierarchy of the filesystem (the mount point). If this is successful, the initramfs is cleared from RAM and the init program on the root filesystem (/sbin/init) is executed.
init handles the mounting and pivoting over to the final real root filesystem. If special hardware drivers are needed before the mass storage can be accessed, they must be in the initramfs image.

Monday, 6 July 2020
Things to Do After Installing Ubuntu 20.04
Things to Do After Installing Ubuntu 20.04
1. Check and Install Package Updates
2. Install Your Favorite Browser
3. Install VLC Media Player
4. Install Media Codecs
5. Install Useful GNOME Extensions
For example, to install the GNOME host connector for Chrome or Firefox, run these commands.
6. Install Additional Archive Utilities
Ubuntu ships with tar, zip and unzip archiving utilities by default. To support different archive files that you can use on Ubuntu, you need to install other additional archiving utilities such as rar, unrar, p7zip-full, and p7zip-rar as shown.
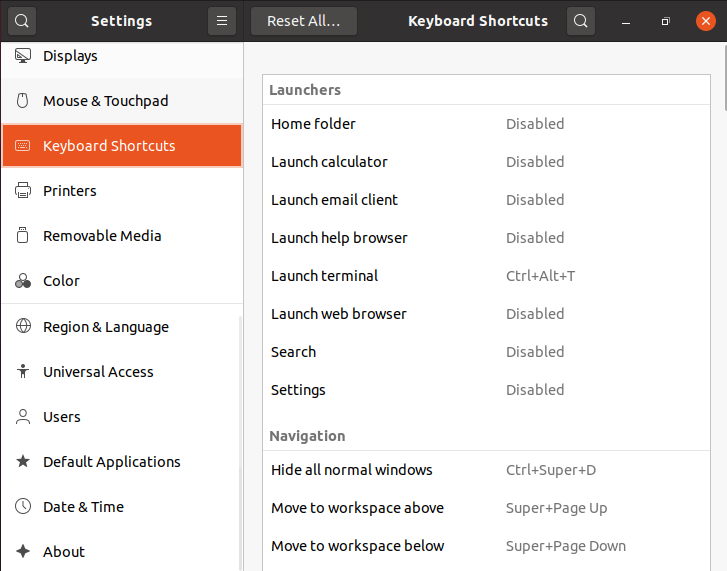
7. Configure Keyboard Shortcuts
Using keyboard shortcuts can increase your productivity and save you lots of time when using a computer. To set your keyboard shortcuts, under Settings, simply click on Keyboard Shortcuts.
8. Add Your Favorite Apps to the Dock
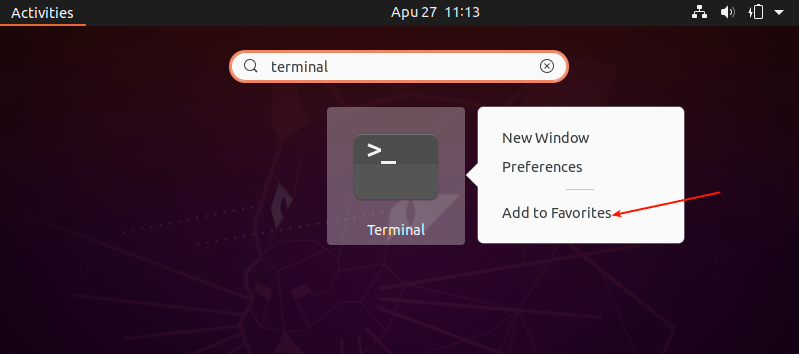
To add your favorite applications to the Ubuntu Dock (which is situated on the left side of your desktop by default), click on the Activities overview, search for the application you want e.g terminal, then right-click on it and select Add to Favorites.
9. Install Laptop Power Saving Tools
If you are using a laptop, then you might want to install Laptop Mode Tools, a simple and configurable laptop power-saving tool for Linux systems. It helps to extend your laptop’s battery life in so many ways. It also allows you to tweak some other power-related settings using a configuration file.
10. Install Apps from the Ubuntu Software and Third-party
Last but not least, go ahead and install more software that you intend to use. You can do this from the Ubuntu Software (or install apps from third-party repositories).
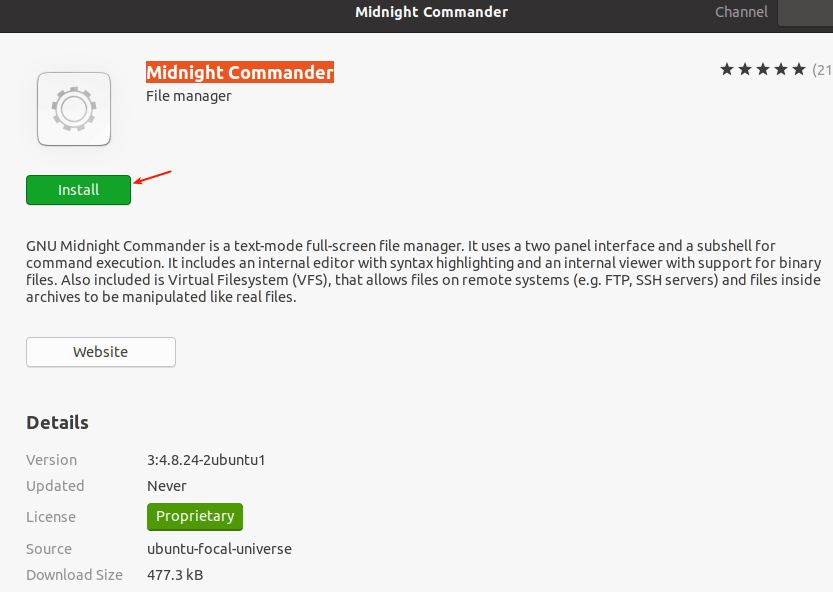
Simply open the Ubuntu Software and use the search feature to find the software you want. For example, to install midnight commander, click on the search icon, type its name, and click on it.
11. Install JAVA
JAVA is the most popular programming language and many applications and websites will not work properly unless you have it installed on your system.
Thursday, 14 May 2020
Tuesday, 10 July 2018
How to use Web Whatsapp
This post is for those who are unaware that how to use whatsapp on
pc or laptop.
So, today I am going to tell
you that how can you use whatsapp on pc or laptop step by step.
1. You should've installed whatsapp on your mobile.

3. Then open your whatsapp on mobile and
and on the upper right corner you have to tap.
4. You will find many options like new
groups and etc. But you have to tap on Whatsapp Web.
5. Then you have to scan the qr code which
is on your pc screen from your mobile.
6. After checking your pc will open you
web whatsapp and you can enjoy whatsapp on pc.
Subscribe to:
Posts (Atom)